Top 5 Tips for Hiring the Right Photographer
February 27, 2014 § Leave a comment
Oh, a post like this has been on my mind for a very long time. I’ve seen so many poor photos plague company webpages and Christmas cards. Your photos can make or break your brand (or your Christmas card), so choosing the right photographer is critical. Here are few thoughts before diving into my top 5 tips for hiring the right photographer.
First of all, this is based on my personal experience with hiring a photographer, both personally as well as professionally. This is what I, as an individual, have found to be true for me. With my design background and training, I have a good eye when it comes to composition, color, and well put together visuals- so I am a credible source when it comes to knowing a good photographer and what you want to look for in photography. Second, a photographer is an artist, so each has their own style. Different styles will appeal to different people. So I’m going to try my best to take out the subjective style part of this and boil is down the more nitty gritty side of things. And last, while I enjoy photography and have taken photos for my clients many times (per their request)- I am in no way saying that I am a professional photographer or advertising my photography services. I admire and respect professional photographers and what they do. I am not at their level of expertise. I pride myself in becoming knowledgeable about the industry so that when my clients need a photographer, I know how to point them in the right direction.
So, now that we have all of that out of the way… here are my top 5 tips for hiring the right photographer.
1. Like what you see. A photographer’s portfolio acts the same as a designer’s portfolio- it speaks directly to you. As I mentioned above, each photographer has a certain style. Pay attention to the lighting, the overall tint of the photo, the color, the filters… do you like it? If not, you won’t like your photos either. A portion of what a photographer does is wrapped up in editing and post processing the photos, and if you really just don’t like a particular reoccurring style throughout their portfolio, you should probably reconsider. Also pay attention to the composition of the photo (how the people are framed in the shot) as well as the poses they’re in. Is it awkward feeling or natural feeling? Do you get caught up on how the subjects are placed in the photo, or is the composition pleasing to the eye? Does it feel forced or comfortable?
2. Pay close attention to detail. Every detail. In everything. Follow a few photographers on Facebook? Pay attention to what they post. Are there spelling, grammar, and simply careless errors being made? Look closely at the quality of their photos (I mean- really close). Are all of their photos in focus? Is the exposure correct? Does the photo feel authentic and real, or is it hiding behind over-processed filters? Pay attention to their design style. Do they know good design? Is their website clean, fresh, and appealing? Is it simple and easy to navigate? Their sense of style in these areas reflects their sense of style in their photography. Pay attention to their equipment. Do they have the necessary equipment for a professional shoot (flashes, lenses, possibly a backup camera for weddings)? When you meet, do they show up well prepared?
3. Communicate well with your photographer. I can set up an entire photo session without talking to my photographer over the phone or meeting them ahead of time in person. Yet by eliminating the face-to-face (or voice-to-voice) interaction, I’m risking not knowing how well we will communicate with each other and how comfortable things will be during the shoot. Can you tell a fake smile from a natural smile? I know I can. And if you’re not comfortable in interacting with your photographer, you won’t be able to relax enough to let the real smile through. You want a photographer who is personable, who is able to direct you clearly into poses that feel natural and comfortable to you, and who can command a pretty-darn-close-to-real smile from you in even the most stressful of moments.
4. Inquire about prices and hidden fees. Photographers should be able to tell you up front what they charge. Do your research and compare photographers and their price lists. Make sure the quality of their photos lines up with what they charge for their services. Know that more expensive photographers typically have more experience and simply take better photos. You get what you pay for. But at the same time, don’t feel too afraid to take a chance on a newbie every once in a while. One of my favorite photographers here locally is just starting out. They (husband and wife) are extremely knowledgeable about the technical side of photography, have an amazing eye for good composition and beautifully styled photos, and are great with post processing- but they’re still new, still building their portfolio, and their costs reflect that. Also make sure you are aware of what the price packages include. What prints or digital files will you receive? Do they have packages that fit what you’re looking for? Are there any hidden fees (such as traveling, multiple location, or outfit change fees)?
5. Ensure your photographer knows you and your intent. Photography is a very personal thing. This is your image, and there is some story you’re trying to tell through your photos. Your photographer should inquire about this and make sure that they completely understand what you want from the photos. Are you celebrating love? Are you wanting a photo of your entire family for Christmas cards? Are you needing a professional photo to go on your website? There is always an intent and a goal with having your photos done. Make sure you communicate that to your photographer and that they don’t go into a shoot without being well informed of that intent ahead of time.
Let photographers be the creatives and professionals that they are, but make sure you do your homework ahead of time so that your experience is memorable- not miserable. Once you find a photographer you work well with (and probably become friends with) and truly admire the work that they do- you’ll have a photographer for life.
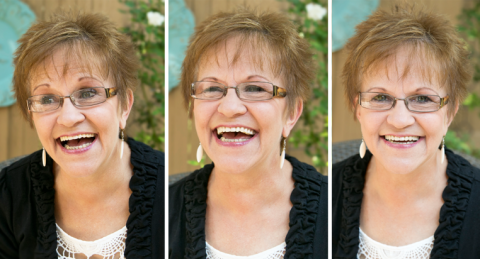
Just had to share some real smiles from one of my clients who I so enjoyed photographing. (click to visit her page)
Are there any red flags you’ve found when hiring a photographer?
Want to add anything to the list, photographers? Is there something you specifically look for when referring your clients to a photographer, designers?
2014 Web Design Trends
February 10, 2014 § 3 Comments
I wrote this back in December, but still find it relevant as we look towards the growing trends of the year ahead.
Lately I’ve read a few articles online from design firms that are predicting the trends of 2014. First of all, let’s clarify the difference between a fad and a trend. A fad is a temporary manner of conduct, and not something that lasts for more than a few short months or weeks. A trend is “a prevailing tendency” and can last for several years. So some of these web trends are trends we’re already witnessing and simply will be seeing more of in the future. How does this apply to you? Make sure your business is keeping a clean, up-to-date web model that will appeal to your audience. You don’t want to appear outdated or behind-the-times when the message your company should communicate is that you’re not only knowledgeable about the latest, but you’re paving the way for the latest. Here they are, my top seven:
1. Responsive web design. I know, we hear this all of the time. But what does responsive web design really mean? It means your website is optimized to be easily viewed from any device with very little adjusting. We’ve all been browsing sites on our phones when we come across a website that is next to impossible to view. Images are trying to adjust, links are so small they’re hardly clickable, and windows (where some fancy flash would normally be) are completely empty. Moving with the times, it’s pertinent your site is optimized to be easily viewed on any handheld device. Well, now that that boring and glaringly obvious point is out of the way…
2. One page, scrolling websites. (This includes the increasingly popular parallax scrolling.) The homepage slider window is dying (if not already dead). Not only are they a nuisance with mobile design, but they’re just plain outdated, distracting, and for a lot of users- annoying. A web designer I work with has predicted that the slider window (most commonly on the PHP platform) will be a thing of the past possibly sooner rather than later. It’s faster, easier, and simpler to just scroll through your one page layout and find what you’re looking for. An alternative to this are drop downs or shortcuts that will send you spiraling through the page to the section you’re looking for. Here’s a cool example: http://www.hugeinc.com/
3. Photo manipulation. Having one, large, beautiful photo on your site is appealing- and a definite design “do.” But the trend, as seen in 2013, is to manipulate the photo stylistically. We already see this in the ever popular Instagram and Over apps. Now we want those filters, those different colors, those complex multiple photo overlays, those trendy font types, all on our websites. I’ll admit, I’m a huge fan of this trend. It allows you to match your photos to your brand- and if your audience can recognize your brand through your photos, well… score. Also, as a part of photo manipulation- geometric shapes are in. So overlay those interesting shapes!
4. Simplified colors and content. Two color web design appears classy and credible. It’s clean. It’s simple. It’s to the point. You have nothing to hide behind all those gaudy font types, textures, and rainbow of colors. You want to say: “This is us. Plain and simple. We know what we’re doing.”
5. Flat design. Thank you, Apple. Bevels, shadows, embossing… all of that used to be cool. It used to be cool for your app icons to look like real little buttons that nearly pop right off your screen. But (thankfully) that’s no longer cool. Once again, all about simple.
6. Mixed font types. It’s always been good to combine your serif and sans serif fonts (if done well) in a visually interesting typographical piece- but alas, the world is finally realizing it. And now it’s more drastic than ever. Keep doing what you’re doing, designer. It’s officially a trend. (Oh, and isn’t hand rendered absolutely the most beautiful?)
7. Animated GIFs. And I’m not talking about the Buzz Feed kind (though aren’t those completely entertaining? YES!). You’ve probably seen more GIFs than you’ve known you have. It can often look like a large window with a playable video in it (shiner.com) or can be as subtle as icons on a website to provide movement (breakitdown.ie). Finally, GIFs, it’s your turn to be on trend.
Thanks to the Cubicle Ninjas, Inspired Mag, and The Next Web for your awesome insight.
How to change photo colors in Photoshop
September 4, 2013 § Leave a comment
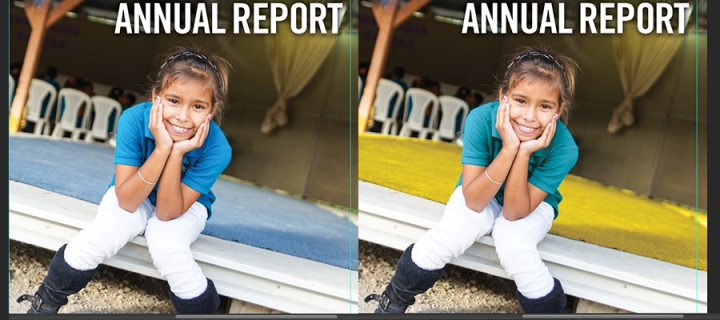
Color changing in photoshop is powerful. I can’t begin to count how many times I’ve changed the color of a person’s shirt to match my design exactly or the color of a wall to make the subject of the photograph stand out. Simply using your brush tool and painting over top of a photo with the layer blending mode set to “Color,” you can change any color in a photo- in as little as ten minutes.
The following tutorial will walk you through the changing of two colors in a particular photo. I did this in Adobe Photoshop CS6, however it can be done in any version of Photoshop.
>Open your photo in Photoshop. Here’s my original photo (above). In all reality, the color composition of the photo is really nice. However, it doesn’t match our company brand, and being that we just went through a re-branding last year (and the girl’s shirt in the photo is the exact color of our OLD logo) I wanted to reinforce our brand through color composition.
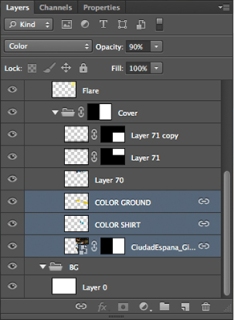
>In the layers panel (F7), create a new layer just above the layer your photo is on. Select the new layer (it will be highlighted).
>In the layers panel, change the blending mode (located at the top of the panel) to “Color” from the drop down menu.
>Select the brush tool (B). Make sure your brush has soft edges- but not too soft so that it appears fuzzy. You’re going to want to be pretty precise, so play with the brush size and hardness until you’re satisfied.
>Select from your color swatches the color that you want to brush with. This is your NEW color. (Note: In color mode, your color won’t be exactly as it appears as a swatch. You’ll probably have to adjust it until you get just the right hue that you desire.)
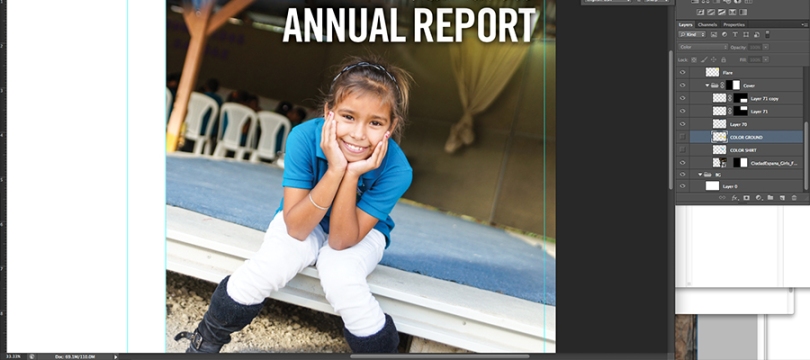
>Using the brush tool, color over top of the old color at 100% opacity. It should look like this:
You’ll need to do quite a bit of refined detail work here, making sure to keep the edges clean.
For every new color you decide to do, make sure you do it on its own layer. This way you can change the layer opacity to make it however vibrant you want it to appear.
Not totally in love with the bright yellow floor, but I think it demonstrates well the change in color and just how drastically different you can make it. Make sure you lock all of your color layers to your photo layers so that if you move the photo, your colors will go along with it!
And you’re done! This is probably as close as I get to being the designer who “colors with crayons” all day.
Before After


